⚡ Mini Project Task 4 — Create a System Backend Using AWS Lambda Triggered by AWS IoT Core
4.0 — 🌿 Create a branch for this task
- On GitHub, in your fork, go to the branches page and click
New branch. Name ittask-4, create it frommain, and clickCreate new branch. - Open your cloned repository in VSCode.
- In a terminal, run
git fetchto make VSCode aware of the new branch. - Check out the new branch:
- On GitHub, in your fork, click on
Pull requests→New pull request. Setbase: mainandcompare: task-4. The description box will be pre-filled from the pull request template — skim it now, you'll fill it in as you go. - Click the dropdown arrow on the
Create pull requestbutton and chooseCreate draft pull requestinstead.
All the work for this task should be committed to the task-4 branch.
What to put in the pull request description
- Title:
Task 4 — Create a system backend using AWS Lambda triggered by AWS IoT Core - Feature purpose: Close the loop — add the cloud-side logic that reacts to the device's message and sends back something meaningful, completing the edge → cloud → edge pipeline.
- Feature architecture: An IoT Rule on
arduino/outgoingtriggers therun_backendLambda, which calls theget_timeLambda and publishes the result toarduino/inbound; the edge device subscribes toarduino/inboundand blinks the LED accordingly. - Feature interfaces: Lambda-to-Lambda invocation (
run_backend→get_time); the IAM role/policy scopingrun_backend's permissions; the MQTT topicsarduino/outgoing(in) andarduino/inbound(out). - Test plan: MQTT test client publishing test payloads to
arduino/outgoingand checkingarduino/inbound(see 4.1.3); then an end-to-end test by pressing the physical button (see 4.2). - Implementation roadmap: e.g. deploy & test
get_time→ deploy & testrun_backendwith its IAM role → create the IoT rule → update the firmware to subscribe/publish and blink → verify end-to-end.
Note
As with the earlier tasks, this breakdown is scaffolding to show you what feature planning looks like — but this time you're implementing it without a step-by-step solution, which is the closest this mini project gets to the group project. There, nobody hands you the purpose, architecture, interfaces, and test plan up front: working those out yourselves is the planning work.
4.1 — ⚡ Create and test a cloud backend with AWS Lambda
In this section, we will implement and test the backend of our application, whose event logic is described in the diagram below.
sequenceDiagram
    box AWS Cloud
        participant I as AWS IoT Core
        participant R as Lambda: run_backend
        participant T as Lambda: get_time
    end

    I->>R: IoT Rule triggers run_backend\n(event payload forwarded)

    R->>T: Call get_time(timezone_offset)
    T-->>R: Return { minutes }

    R->>I: MQTT Publish\nTopic: arduino/inbound\nPayload: { minutes }
4.1.1 — 🕐 Create and test the Lambda function get_time
- Using the search bar, open AWS Lambda.
- Click on
Create function:- Choose
Author from scratch. - Name it
get_time. - Choose the runtime
Python 3.14. - Choose the architecture
x86_64. - Click on
Create function.
- Choose
- In the
Codetab, you should see a VSCode-like window with alambda_function.pyfile containing placeholder code. Replace this code with the content of the filelambdas/get_time/handler.py. Click onDeploy. - In the
Testtab, create a new event:- Select
Synchronousinvocation. - Name the event
gmt. - Make the event
Sharable. - In
Event JSON, copy the contents oflambdas/get_time/gmt.json. - Click on
Test, and if the execution is successful, click onSave.
- Select
- Create two more test events, one for GMT+2, and one for GMT-2.
- Verify that the Lambda function behaves as expected.
4.1.2 — ⚙️ Create and test the Lambda function run_backend
- In AWS Lambda, go to functions, and create a new function:
- Choose
Author from scratch. - Name it
run_backend. - Choose the runtime
Python 3.14. - Choose the architecture
x86_64. - In
Change default execution role, click onUse an existing role→ actually clickUse another role, and click onCreate new role.
- Choose
- In this new role, we will give this Lambda function access to other Lambda functions (to trigger
get_time) and to AWS IoT Core (to publish MQTT messages).- In additional policy, create a new policy, and paste the content of
infra/policies/run_backend.json. - Click on
Create. - Click on
Create function.
- In additional policy, create a new policy, and paste the content of
- In the MQTT test client, subscribe to the topic
arduino/inbound. - Using the code in
lambdas/run_backend/handler.py, deploy and test the function. Use the MQTT test client to verify it posts messages to the topicarduino/inbound.
4.1.3 — 🔗 Create and test an AWS IoT rule to trigger run_backend
- In AWS IoT, click on
Manage→Message routing→Rules, and click onCreate rule. - Name the rule
arduino_outgoing. - Configure the SQL statement using
infra/iot_rules/arduino_outgoing.sql. - In
Rule actions, selectLambda, and chooserun_backend. Click onNext, andCreate. -
In the MQTT test client:
- Subscribe to
arduino/outgoing. - Subscribe to
arduino/inbound. - Publish on topic
arduino/outgoingthe following:
- Subscribe to
-
Check that messages are posted on
arduino/inbound.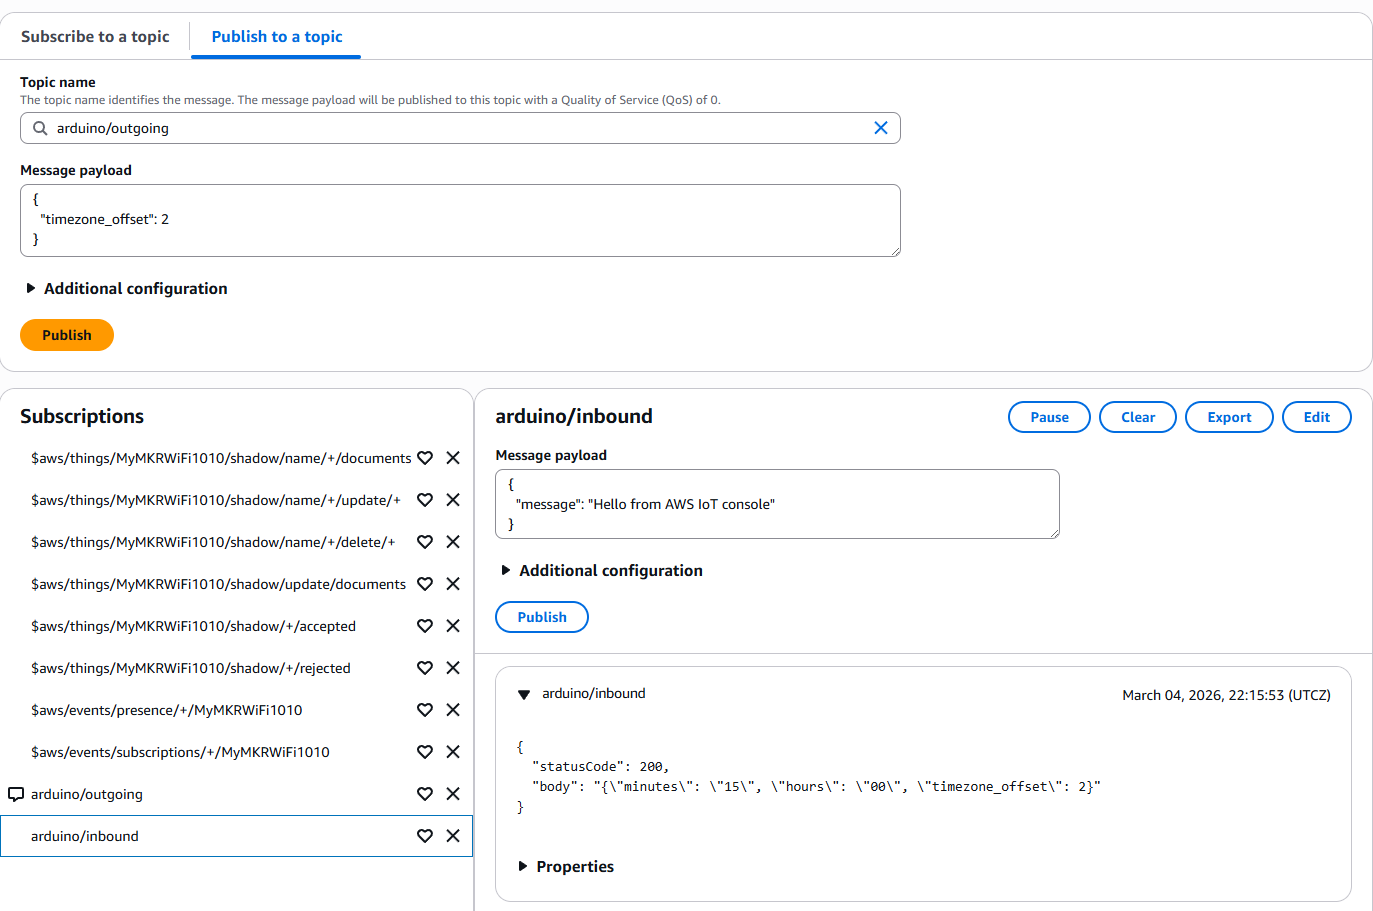
4.2 — 🔄 Update the firmware of the edge device to test the system end-to-end
sequenceDiagram
    box Edge Device
        participant PB as Push Button
        participant L as LED
        participant A as Arduino
    end

    box AWS Cloud
        participant I as AWS IoT Core
        participant R as Lambda: run_backend
        participant T as Lambda: get_time
    end

    PB->>A: Button pressed
    A->>L: LED off

    A->>I: MQTT Publish\nTopic: arduino/outgoing\nPayload: { timezone_offset }

    I->>R: IoT Rule triggers run_backend\n(event payload forwarded)

    R->>T: Call get_time(timezone_offset)
    T-->>R: Return { minutes }

    R->>I: MQTT Publish\nTopic: arduino/inbound\nPayload: { minutes }

    I->>A: Deliver MQTT message\nTopic: arduino/inbound\n{ minutes }

    A->>L: Blink LED N times\n(N = current minute)

    A->>L: LED on
This time, you're on your own! If you followed this tutorial step-by-step, you have all the skills and resources needed to implement it without solutions.
4.3 — 🔀 Submit the task for review
- Commit and push your changes to the
task-4branch — they show up automatically in your draft pull request. - Finish filling in the pull request description from the template (purpose, architecture, interfaces, test plan, roadmap).
- On the pull request page, click
Ready for reviewto take it out of draft. - Request a review from the course educator you added as a collaborator in Getting Started (click the gear icon next to
Reviewers). - Once the pull request is approved, click
Merge pull request→Confirm merge. - On GitHub, in your fork, click on
Releases(in the right sidebar of the repository home page) →Create a new release. ClickChoose a tag, typev4.0.0, and clickCreate new tag: v4.0.0 on publish. Make sureTargetis set tomain, then clickPublish release.
Congratulations — you've built the complete end-to-end system!